如标题所示,作者并没有完成脱壳学玛仕 DMM 客户端的所有步骤,所以并没有轮子可用。相反,本文的主要目的是记录一些在逆向 Win32 PE 程序时可能常用的一些技巧。
自从学玛仕 DMM 端发布以来已经有一段时间了。GameAssembly.dll 的结构,发现果然被混淆/加密之后就放置了。毕竟我们已经有 libil2cpp.so 了,再拿个 GameAssembly.dll 用处也不大。
结论是,gakumas.exe 和 GameAssembly.dll 被相同的手法分多个 stage 加壳,并且在加壳过程中使用了字节码级别的控制流混淆和堆栈修改操作,同时在有效 payload 间穿插着许多无效字节码和误导性指令,使得解析变得极为困难。
虽然其加壳手段十分狡猾且复杂,但如果目的只是想要获得有效的 GameAssembly.dll,其实是根本没有必要花这么大功夫去静态分析的,使用 dump 内存的万能大法即可不费吹灰之力获得。
那为什么我要去静态分析它?
可能只是想要体验一下 PE 程序的逆向过程吧,到目前为止我的研究还仅限于 ELF 呢(
需要注意的是,本文没有完成脱壳所需的所有 stage。因为在完成 stage 1 之后发现有一大段字节码级别的控制流混淆,而解开这类混淆需要付出极大的精力而非智力,于是我选择放弃。就像 katy 佬在其博客里写的一样:
It’s not that it can’t be reverse engineered, it’s just that the effort and resources required to do so is so great that it outweighs the benefit of actually succeeding.
开始 首先将 GameAssembly.dll 丢进 IDA。GameAssembly.dll 是通过 UnityPlayer.dll 装载进内存的,所以这时我决定将 UnityPlayer.dll 丢进 IDA 尝试分析。UnityMain() -> UnityMainImpl() -> LoadScriptingRuntime() 执行过程中,没有发现任何可疑的痕迹。于是我使用 UnityHub 新建了一个与游戏所使用的相同版本的 Unity project,编译后对比两个 UnityPlayer.dll 的 binary,结果发现完全一致。UnityPlayer.dll 并没有经过任何修改。可是,GameAssembly.dll 究竟是不是从 UnityPlayer.dll 被读取的呢?
竟然不是从 UnityPlayer.dll,而是直接由主程序 gakumas.exe 读取的!
那么这时就有了两种可能性:
GameAssembly.dll 在被主程序读取后,由主程序负责脱壳GameAssembly.dll 在被读取后,由其自身的 entry point 负责脱壳
这时我选择了第 1 种可能性进行研究,于是将 gakumas.exe 丢进 IDA 开始分析。
注意:实际上游戏采用了第 2 种方法进行自脱壳,但由于 gakumas.exe 和 GameAssembly.dll 采用了完全相同的自脱壳逻辑,以下仍将以 gakumas.exe 作为研究对象展开。
Stage 1 主程序丢入 IDA 之后,仍然是一分钟不到结果就跑出来了,并且查看 functions 的内容会发现与先前 GameAssembly.dll 的 functions 极其相似。这不到十个的 functions 即是第一阶段的脱壳代码。
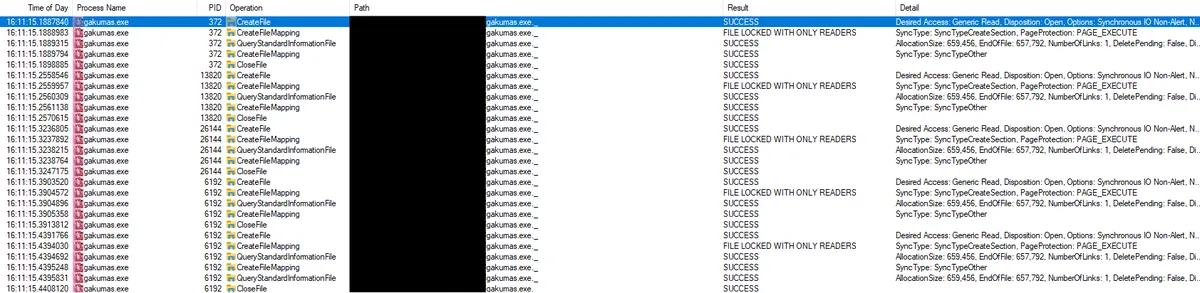
寻找突破口 回到 Procmon,将 process name 设置为 “gakumas.exe” 寻找线索。
一看这个名字 gakumas.exe._,就知道十分可疑。随便猜测一下就能想到这里面包含了被混淆后的主程序执行所需的代码和资源。
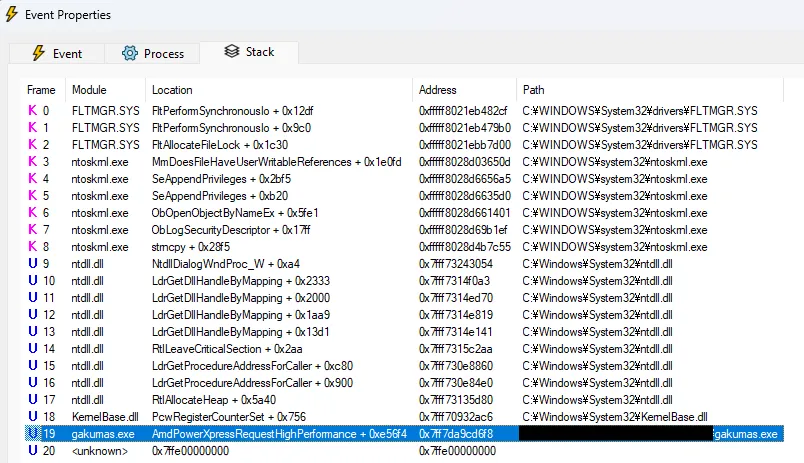
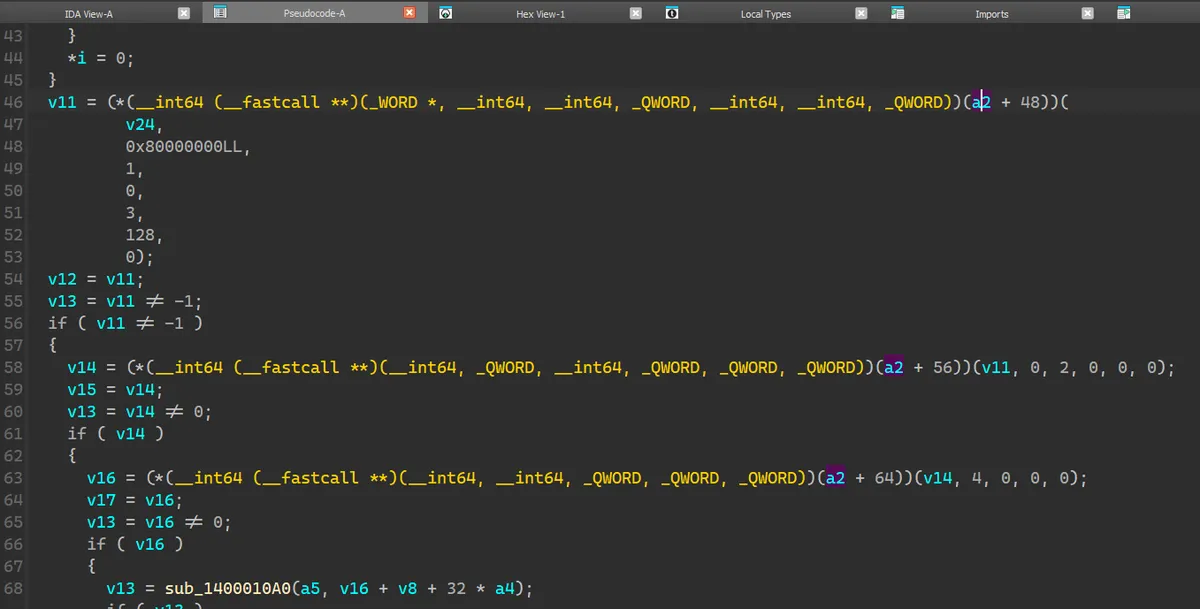
注意这里的偏移量 0x1848,说明程序在位于 0x1848 的前一个指令调用了 Win32 函数 CreateFileW
其前一个 instruction 正好就是 call,与 Procmon 观察到的事实相符。切换到 decompiler 视图,查看其内容:
发现是调用了 a2 + 48(即 a2 + 0x30)这个函数指针。观察周围会发现还有许多类似的使用 a2 加上不同偏移量的调用,那么我们可以断定 a2 是一个用于储存函数指针的数组。并且通过 CreateFileW 的 signature 可以知道 v24 是 lpFileName 即文件名,这里打开的文件是 gakumas.exe._,所以其值就是它。返回值 v11 是文件的 handle。
这样子我们便有了一个突破口,由这个突破口展开,配合 Procmon,可以将整个函数的变量即作用解析出来:
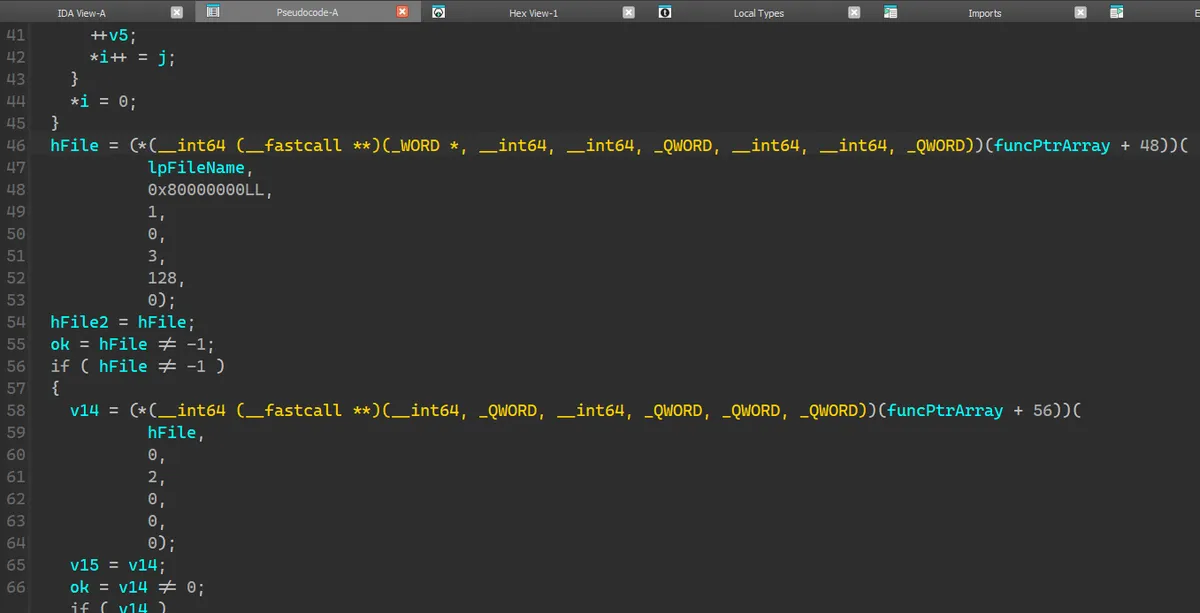
1
2
3
4
5
6
7
8
9
10
11
12
13
14
15
16
17
18
19
20
21
22
23
24
25
26
27
28
29
30
31
32
33
34
35
36
37
38
39
40
41
42
43
44
45
46
47
48
49
50
51
52
53
54
55
56
57
58
59
60
61
62
63
64
65
66
67
68
69
70
71
72
73
74
75
76
77
78
79
80
81
82
83
84
85
86
87
88
89
90
91
92
93
94
95
96
97
98
99
100
101
102
103
104
105
106
107
108
109
110
111
112
113
114
115
116
_BOOL8 __fastcall copyPayload ( __int64 lpAddress, __int64 funcPtrArray, _DWORD *suffixArrary, int iteration, int *mpArray) { char *libSuffix; int initArrOffset1; _WORD *i; char j; __int64 hFile; __int64 hFile2; BOOL ok; __int64 hFileMem; __int64 v15; __int64 mappedAddr; __int64 mappedFileAddr; __int64 dstAddr; int *srcAddr; signed int size; __int64 dstAddr3; __int64 dstAddr2; _WORD lpFileName[264 ]; int srcOffset1; int *srcAddr2; libSuffix = (char *)(suffixArrary + 2 ); if ( suffixArrary[2 ] ) { initArrOffset1 = suffixArrary[1 ]; srcOffset1 = initArrOffset1; } else { initArrOffset1 = *suffixArrary; srcOffset1 = *suffixArrary; } (*(void (__fastcall **)(__int64, _WORD *, __int64))(funcPtrArray + 0x28 ))(lpAddress, lpFileName, 260 ); if ( *(_DWORD *)libSuffix ) { for ( i = lpFileName; *i; ++i ) ; for ( j = *libSuffix; *libSuffix; j = *libSuffix ) { ++libSuffix; *i++ = j; } *i = 0 ; } hFile = (*(__int64 (__fastcall **)(_WORD *, __int64, __int64, _QWORD, __int64, __int64, _QWORD))(funcPtrArray + 0x30 ))( lpFileName, 0x80000000 LL, 1 , 0 , 3 , 128 , 0 ); hFile2 = hFile; ok = hFile != -1 ; if ( hFile != -1 ) { hFileMem = (*(__int64 (__fastcall **)(__int64, _QWORD, __int64, _QWORD, _QWORD, _QWORD))(funcPtrArray + 0x38 ))( hFile, 0 , 2 , 0 , 0 , 0 ); v15 = hFileMem; ok = hFileMem != 0 ; if ( hFileMem ) { mappedAddr = (*(__int64 (__fastcall **)(__int64, __int64, _QWORD, _QWORD, _QWORD))(funcPtrArray + 0x40 ))( hFileMem, 4 , 0 , 0 , 0 ); mappedFileAddr = mappedAddr; ok = mappedAddr != 0 ; if ( mappedAddr ) { ok = initMappingArray(mpArray, (_DWORD *)(mappedAddr + initArrOffset1 + 0x20 * iteration)); if ( ok ) { dstAddr = lpAddress + mpArray[3 ]; srcAddr = (int *)(mappedFileAddr + srcOffset1 + mpArray[4 ]); dstAddr2 = dstAddr; srcAddr2 = srcAddr; if ( iteration ) { unobfuscateExe(dstAddr, srcAddr, mpArray[5 ], *mpArray); } else { size = mpArray[6 ] - mpArray[3 ] + 0x2000 ; unobfuscateExe(dstAddr, srcAddr, size, *mpArray); copyWithoutChange(size + dstAddr2, (__int64)srcAddr2 + size, mpArray[5 ] - size); copyWithoutChange(dstAddr3, (__int64)suffixArrary, 0xF u); } } } if ( mappedFileAddr ) (*(void (__fastcall **)(__int64))(funcPtrArray + 0x48 ))(mappedFileAddr); } if ( v15 ) (*(void (__fastcall **)(__int64))(funcPtrArray + 0x50 ))(v15); } if ( hFile2 != -1 ) (*(void (__fastcall **)(__int64))(funcPtrArray + 0x50 ))(hFile2); return ok; }
注意上面的变量名与注释是最终的解析结果,并非全部是只通过这单个函数解读出来的,有一部分是根据其外层函数的处理解读的。
反混淆 & 内存移动 上面的函数中有三个调用至关重要,initMappingArray,unobfuscateExe 和 copyWithoutChange。
initMappingArray 用于生成一个后续各种操作中都会使用到的数组,其逻辑用 Rust 写出来是:
1
2
3
4
5
6
7
8
9
10
11
12
13
14
15
16
17
18
19
20
21
22
23
24
25
26
27
28
29
30
31
32
33
fn init_mapping_array (src: &[u8 ], idx: &mut u32 ) -> Result <[i32 ; 8 ], Box <dyn Error>> { let mut result = [0i32 ; 8 ]; let mut m = [0i32 ; 8 ]; for i in 0 ..8 { m[i] = utils::read_to_i32 (src, *idx as usize , None )?; *idx += 4 ; } result[0 ] = m[0 ]; let v4 = m[1 ].wrapping_add (m[0 ]); result[1 ] = m[0 ] ^ m[1 ]; let v5 = m[2 ]; let v6 = (v5.wrapping_add (v4) - 1 ) ^ 1 ; result[2 ] = v4 ^ v5; let v7 = (m[3 ].wrapping_add (v6) - 2 ) ^ 4 ; result[3 ] = v6 ^ m[3 ]; let v8 = (m[4 ].wrapping_add (v7) - 3 ) ^ 9 ; result[4 ] = v7 ^ m[4 ]; let v9 = (m[5 ].wrapping_add (v8) - 4 ) ^ 0x10 ; result[5 ] = v8 ^ m[5 ]; let v10 = m[6 ]; result[6 ] = v9 ^ v10; result[7 ] = (v10.wrapping_add (v9) - 5 ) ^ 0x19 ^ m[7 ]; if result[1 ] != 0x4E4E4F4B { println! ( "failed to initialize init_mapping_array: result[1] except 0x4E4E4F4B, given 0x{:X}" , result[1 ] ); return Err ("init_mapping_array signature mismatched" .into ()); } Ok (result) }
unobfuscateExe 用于将 map 到内存中的文件反混淆后复制到目标地址,copyWithoutChange 则直接将来源的内存块复制到目标地址。
1
2
3
4
5
6
7
8
9
10
11
12
13
14
15
16
17
18
19
20
21
22
23
24
25
26
27
28
pub fn unobfuscate ( dst: *mut u32 , src: *const u32 , size: u32 , init_key: i32 , ) -> Result <(), Box <dyn Error>> { let mut key = (!size).wrapping_add (init_key as u32 ); let size_in_u32 = size >> 2 ; let mut factor : u32 ; if size_in_u32 <= 0 { println! ("warning: unobfuscation size equals 0" ); return Ok (()); } unsafe { let offset = dst as isize - src as isize ; for i in 0 ..size_in_u32 { let chunk = *src.offset (i as isize ); let v10 = chunk.wrapping_add (i); let plain_chunk = key ^ chunk; factor = i.wrapping_mul (i); let dst_ptr = (src.offset ((i + 1 ) as isize ) as *mut u8 ).offset (offset - 4 ) as *mut u32 ; *dst_ptr = plain_chunk; key = factor ^ v10.wrapping_add (key); } } Ok (()) }
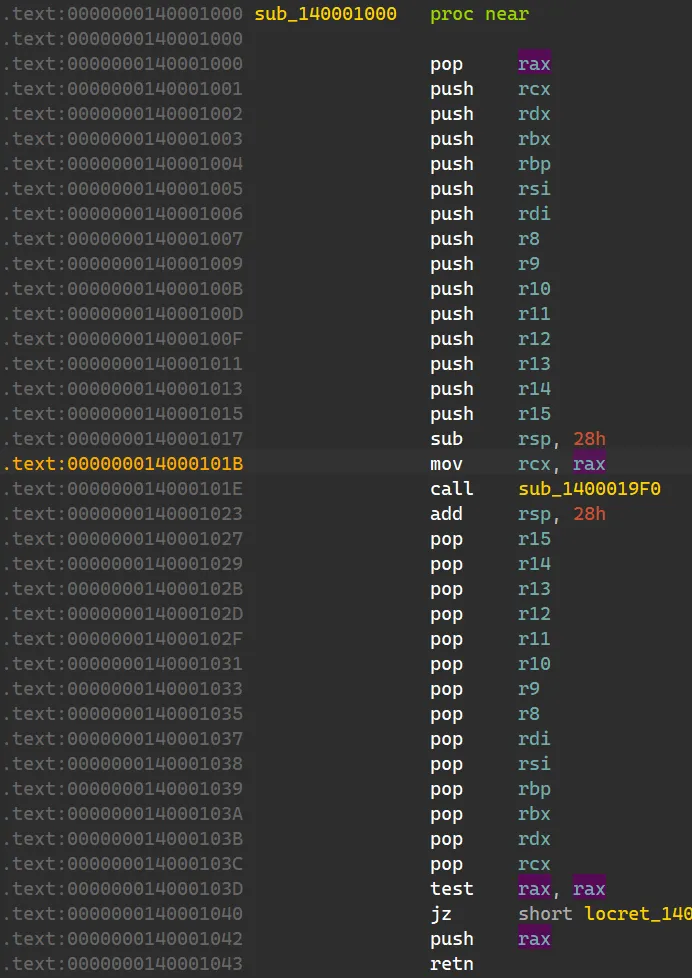
堆栈操作 大致解读完上述的函数后,在其 signature 处进行交叉链接来到其外层函数,用相同的方法尝试解析。
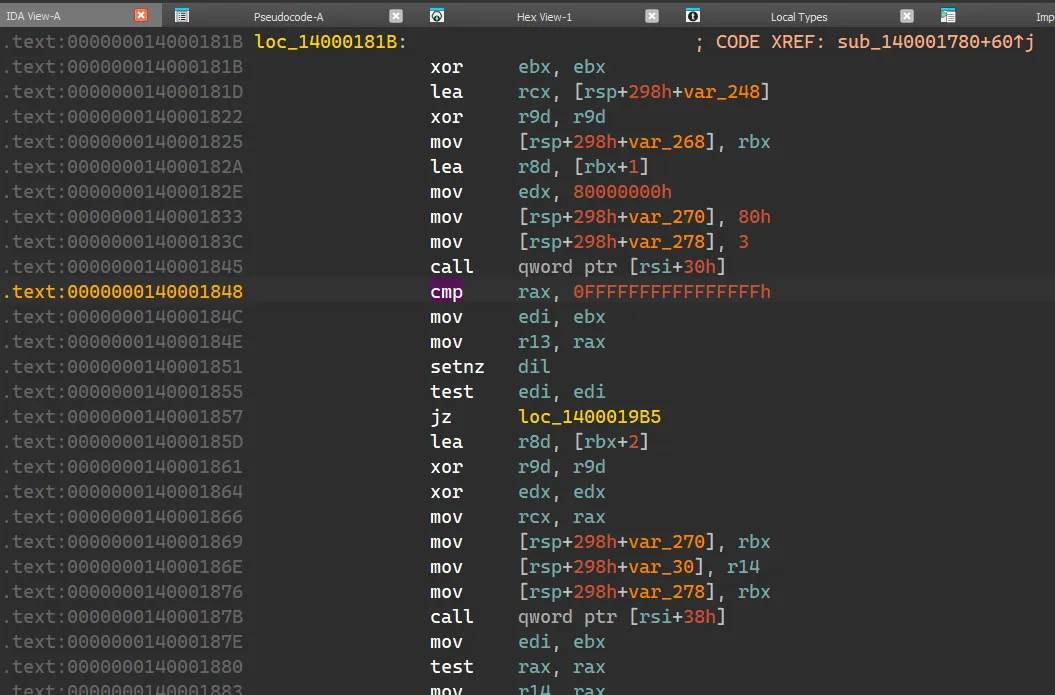
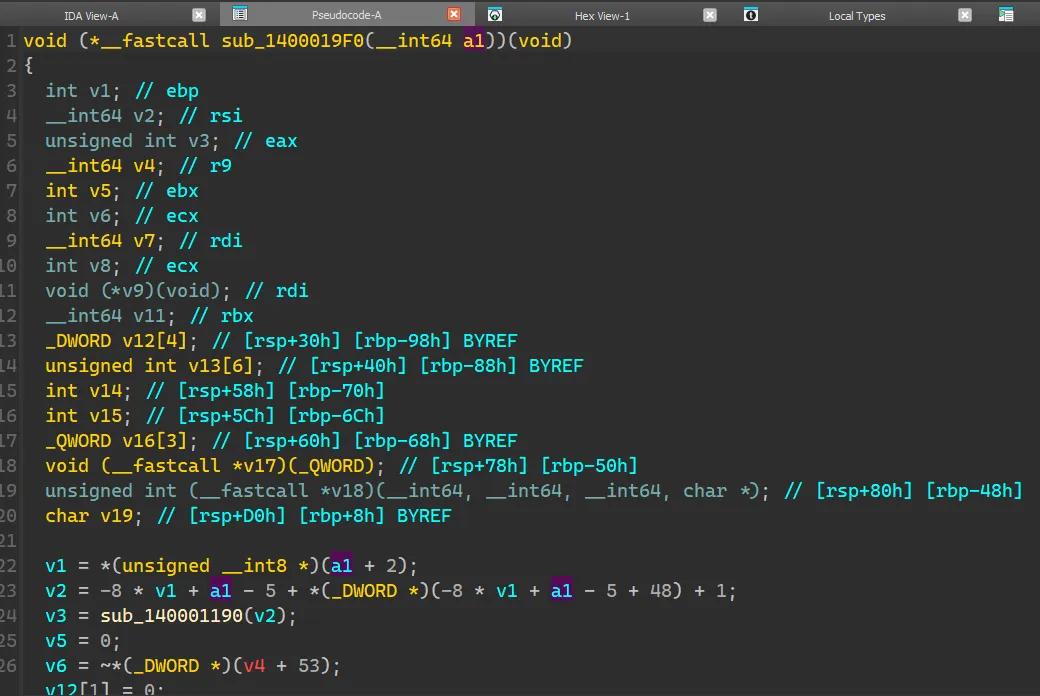
首先看看它的 signature,表明这个函数有一个参数。
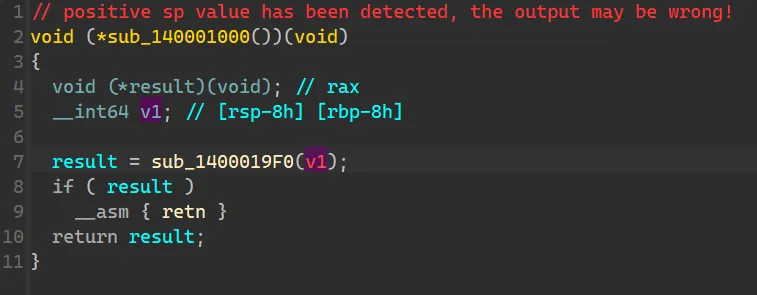
IDA 给出的参数是红的,说明只凭 IDA 的有限之力无法正确地解析出来。先暂时不管它,继续往上交叉链接,会发现是程序的 entry point,所做的操作只有这个函数的调用,没什么值得关注的。19F0 这个函数,会发现好多变量都是从 a1 这个参数演变而来的,所以必须得弄清楚 a1 究竟是个什么玩意儿。1000,既然 IDA 的反编译无法解析出来这个参数是什么,咱就只有硬读汇编了。切换到汇编视图,发现:
根据 x86_64 calling convention ,寄存器 rcx 用于传递第一个参数。从上图可看出在 call 函数 19F0 直前程序将 rax move 到了 rcx,而在函数开头的部分,程序将堆栈上的值 pop 到了 rax。19F0 返回后将返回值 rax push 到了栈上。19F0 的参数 a1 是 entry point + 5 (这里的 5 是 call 指令自身的字节码长度) 的地址,并且其返回值是跳转到下一段可执行代码的地址。
获得这些信息后,便可回到函数 19F0,将目前所掌握的信息反映到变量名中。
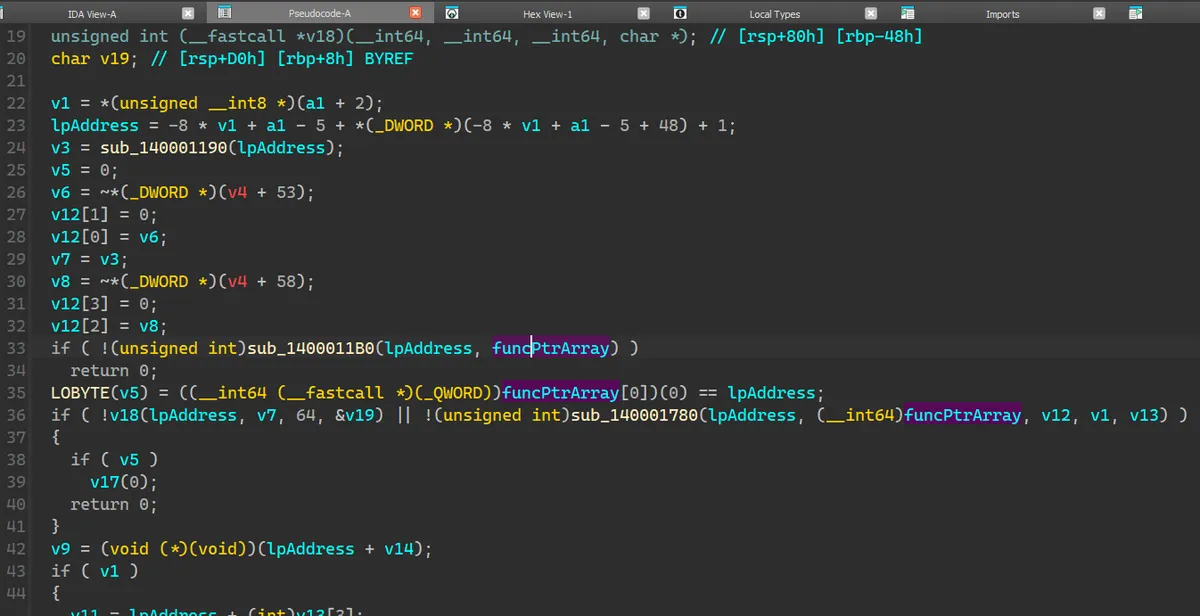
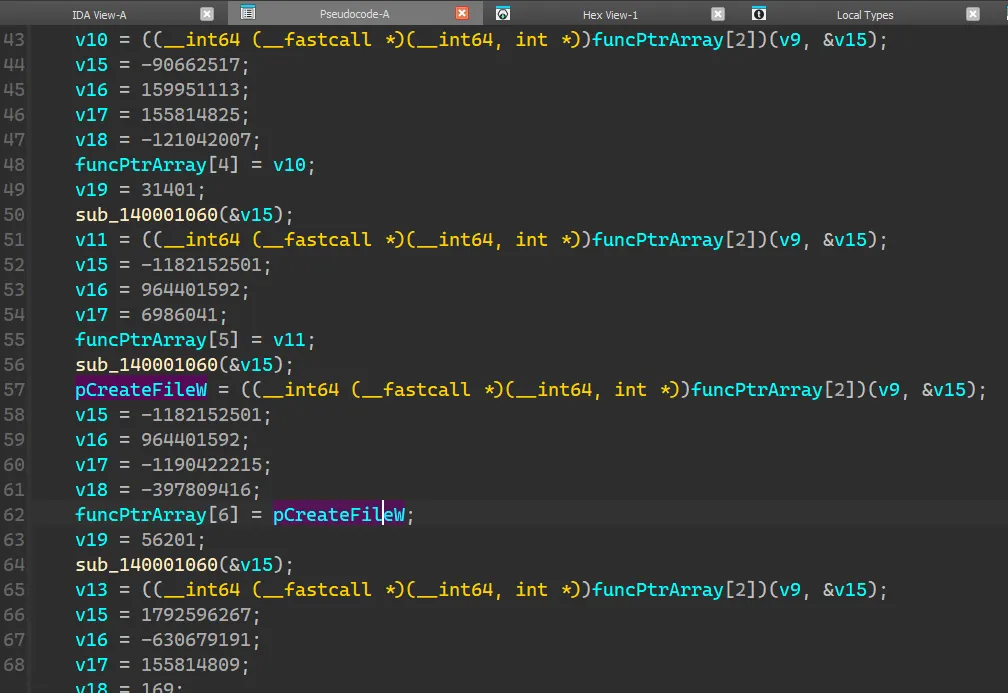
Win32 API 函数名混淆 继续解读 19F0。解读到一定程度时会发现有一个神秘的函数 11B0,接收了还未初始化的 funcPtrArray 当作参数,随后便开始使用里面的函数指针。
那么很有可能这个函数的作用就是初始化这个函数指针数组。点进去会发现大概长这个样子。
首先我将已知的 funcPtrArray[6] (即前面分析过的 funcPtrArray + 0x30) 设置为 pCreateFileW,而这个函数指针是通过调用 funcPtrArray[2] 以及变量 v9 和 v15 获得。观察上下文可以注意到 v9 是不变的,不同点只有 v15,那么可以猜测 v15 是用于寻找函数的关键变量。funcPtrArray[2] 之前程序都给 v15 以及一堆变量赋上了意义不明的 DWORD 值,然后调用函数 1060 处理 v15。1060,发现是一个很短的函数,看上去很像是一个反混淆的小循环。
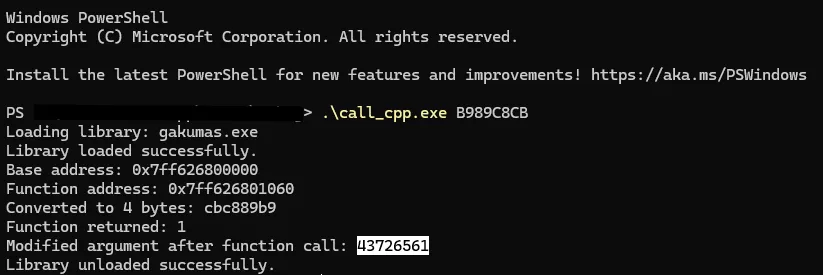
1
2
3
4
5
6
7
8
9
10
11
12
13
__int64 __fastcall sub_140001060 (char *a1) { int i; char v2; char v3; for ( i = 0 ; *a1; *(a1 - 1 ) = ~__ROL1__(v2, 4 ) - v3 ) { v2 = *a1++; v3 = i++ & 3 ; } return 1 ; }
于是我抄起 IDE 写了一小段代码打算直接动态调用这段函数查看返回的结果:
1 2 3 4 5 6 7 8 9 10 11 12 13 14 15 16 17 18 19 20 21 22 23 24 25 26 27 28 29 30 31 32 33 34 35 36 37 38 39 40 41 42 43 44 45 46 47 48 49 50 51 52 53 54 55 56 57 58 59 60 using FuncType = __int64(__fastcall *)(char *);void execGetLibString (const std::string& libraryPath, const DWORD functionRVA, char *argv[]) std::string hexString = argv[1 ]; std::cout << "Loading library: " << libraryPath << std::endl; HMODULE hModule = LoadLibraryA (libraryPath.c_str ()); if (!hModule) { std::cerr << "Failed to load library. Error: " << GetLastError () << std::endl; return ; } std::cout << "Library loaded successfully." << std::endl; LPVOID baseAddress = reinterpret_cast <LPVOID>(hModule); std::cout << "Base address: 0x" << std::hex << reinterpret_cast <uintptr_t >(baseAddress) << std::dec << std::endl; LPVOID functionAddress = reinterpret_cast <LPVOID>( reinterpret_cast <uintptr_t >(baseAddress) + functionRVA); std::cout << "Function address: 0x" << std::hex << reinterpret_cast <uintptr_t >(functionAddress) << std::dec << std::endl; FuncType targetFunction = reinterpret_cast <FuncType>(functionAddress); std::vector<uint8_t > byteArray = hexStringToBytes (hexString); std::cout << "Converted to " << byteArray.size () << " bytes: " ; for (const auto &byte : byteArray) { std::cout << std::hex << std::setw (2 ) << std::setfill ('0' ) << static_cast <int >(byte); } std::cout << std::dec << std::endl; try { __int64 result = targetFunction (reinterpret_cast <char *>(byteArray.data ())); std::cout << "Function returned: " << result << std::endl; std::cout << "Modified argument after function call: " ; for (const auto &byte : byteArray) { std::cout << std::hex << std::setw (2 ) << std::setfill ('0' ) << static_cast <int >(byte); } std::cout << std::dec << std::endl; } catch (...) { std::cerr << "Exception occurred while calling the function!" << std::endl; FreeLibrary (hModule); return ; } FreeLibrary (hModule); std::cout << "Library unloaded successfully." << std::endl; }
其中 libraryPath 这里是 “gakumas.exe”,functionRVA 是目标函数的 RVA 0x1060,argv 是传给其的参数,这里是各个 v15 的值。
v15 在执行之后变成了 0x43726561,这是什么东西?
即 Win32 API 函数 CreateFileW 的前 4 个字节。1060 的作用是将被混淆后的函数名复原。
1
2
3
4
5
6
7
04 VirtualProtect 05 GetModuleFileNameW 06 CreateFileW 07 CreateFileMappingA 08 MapViewOfFile 09 UnmapViewOfFile 10 CloseHandle
而 0 ~ 3 可以通过进一步解析发现是 import table 中的函数。
1
2
3
4
5
6
7
8
9
10
11
12
13
14
15
16
17
18
19
20
21
22
23
24
25
26
27
28
29
30
31
32
33
34
35
36
37
38
39
40
41
42
43
44
45
46
47
48
49
50
51
52
53
54
55
56
57
58
59
60
61
62
63
64
65
66
67
68
69
70
71
72
73
74
75
76
77
78
79
80
81
82
83
84
85
86
87
88
__int64 __fastcall initFunctionPointers (__int16 *baseAddr, _QWORD *funcPtrArrary) { __int64 peHeaderAddr; __int64 baseAddr2; __int64 imRVA; __int64 imAddrTbRVA; _QWORD *importAddrTable; __int64 (__fastcall *v8)(_DWORD *); __int64 kernel32DLL; __int64 v10; __int64 v11; __int64 pfCreateFileW; __int64 pfCreateFileMappingA; __int64 v14; unsigned int v15; unsigned int v16; unsigned int v17; unsigned int v18; int v19; _DWORD v20[8 ]; peHeaderAddr = (__int64)getPEHeaderAddr(baseAddr); if ( peHeaderAddr ) { imRVA = *(int *)(peHeaderAddr + 0x90 ); v20[0 ] = 0xE8B89949 ; imAddrTbRVA = *(int *)(imRVA + baseAddr2 + 0x10 ); v20[1 ] = 0xACAC29A9 ; v20[2 ] = 0x919A91D ; importAddrTable = (_QWORD *)(baseAddr2 + imAddrTbRVA); v20[3 ] = 0 ; funcPtrArrary[1 ] = *importAddrTable; funcPtrArrary[2 ] = importAddrTable[1 ]; *funcPtrArrary = importAddrTable[2 ]; funcPtrArrary[3 ] = importAddrTable[3 ]; decryptFuncName((char *)v20); v15 = 0x88B8599A ; v16 = 0xCA19D9A8 ; v17 = 0x7998F8D8 ; v18 = 0xA8C9 ; kernel32DLL = v8(v20); decryptFuncName((char *)&v15); v10 = ((__int64 (__fastcall *)(__int64, unsigned int *))funcPtrArrary[2 ])(kernel32DLL, &v15); v15 = 0xFA98998B ; v16 = 0x988A909 ; v17 = 0x9498BA9 ; v18 = 0xF8C90BA9 ; funcPtrArrary[4 ] = v10; v19 = 0x7AA9 ; decryptFuncName((char *)&v15); v11 = ((__int64 (__fastcall *)(__int64, unsigned int *))funcPtrArrary[2 ])(kernel32DLL, &v15); v15 = 0xB989C8CB ; v16 = 0x397B99B8 ; v17 = 0x6A9939 ; funcPtrArrary[5 ] = v11; decryptFuncName((char *)&v15); pfCreateFileW = ((__int64 (__fastcall *)(__int64, unsigned int *))funcPtrArrary[2 ])(kernel32DLL, &v15); v15 = 0xB989C8CB ; v16 = 0x397B99B8 ; v17 = 0xB90B9939 ; v18 = 0xE849E8F8 ; funcPtrArrary[6 ] = pfCreateFileW; v19 = 0xDB89 ; decryptFuncName((char *)&v15); pfCreateFileMappingA = ((__int64 (__fastcall *)(__int64, unsigned int *))funcPtrArrary[2 ])(kernel32DLL, &v15); v15 = 0x6AD8D92B ; v16 = 0xDA689969 ; v17 = 0x9498B99 ; v18 = 0xA9 ; funcPtrArrary[7 ] = pfCreateFileMappingA; decryptFuncName((char *)&v15); v14 = ((__int64 (__fastcall *)(__int64, unsigned int *))funcPtrArrary[2 ])(kernel32DLL, &v15); v15 = 0xB90909AA ; v16 = 0x79498AF8 ; v17 = 0x6B79FA88 ; v18 = 0x892969 ; funcPtrArrary[8 ] = v14; decryptFuncName((char *)&v15); funcPtrArrary[9 ] = ((__int64 (__fastcall *)(__int64, unsigned int *))funcPtrArrary[2 ])(kernel32DLL, &v15); v15 = 0x98E829CB ; v16 = 0xE8C96BA9 ; v17 = 0x8929B9 ; decryptFuncName((char *)&v15); funcPtrArrary[10 ] = ((__int64 (__fastcall *)(__int64, unsigned int *))funcPtrArrary[2 ])(kernel32DLL, &v15); return 1 ; } return peHeaderAddr; }
Stage 1 总结 获得了完整的 funcPtrArray 之后,整个函数的解读就轻而易举了。这里直接贴出解析完成后的函数:
1
2
3
4
5
6
7
8
9
10
11
12
13
14
15
16
17
18
19
20
21
22
23
24
25
26
27
28
29
30
31
32
33
34
35
36
37
38
39
40
41
42
43
44
45
46
47
48
49
50
51
52
53
54
55
56
57
58
59
60
61
62
63
64
void (*__fastcall doIteration(__int64 returnAddr))(void ){ int it; __int16 *lpAddress; unsigned int realImageSize; __int64 v4; int isSameBase; int v6; __int64 dwSize; int v8; void (*nextEntrypoint)(void ); __int16 *newImageBase; _DWORD suffixArrary[4 ]; char mpArray[12 ]; int mp3; int realEntryPointOffset; int mp7; _QWORD funcPtrArrary[3 ]; void (__fastcall *exitProcess)(_QWORD); unsigned int (__fastcall *fpVirtualProtect) (__int16 *, __int64, __int64, char *) ; char lpflOldProtect; it = *(unsigned __int8 *)(returnAddr + 2 ); lpAddress = (__int16 *)(-8 * it + returnAddr - 5 + *(_DWORD *)(-8 * it + returnAddr - 5 + 0x30 ) + 1 ); realImageSize = getImageSize(lpAddress); isSameBase = 0 ; v6 = ~*(_DWORD *)(v4 + 0x35 ); suffixArrary[1 ] = 0 ; suffixArrary[0 ] = v6; dwSize = realImageSize; v8 = ~*(_DWORD *)(v4 + 0x3A ); suffixArrary[3 ] = 0 ; suffixArrary[2 ] = v8; if ( !(unsigned int )initFunctionPointers(lpAddress, funcPtrArrary) ) return 0 ; LOBYTE(isSameBase) = ((__int64 (__fastcall *)(_QWORD))funcPtrArrary[0 ])(0 ) == (_QWORD)lpAddress; if ( !fpVirtualProtect(lpAddress, dwSize, 0x40 , &lpflOldProtect) || !copyPayload((__int64)lpAddress, (__int64)funcPtrArrary, suffixArrary, it, (int *)mpArray) ) { if ( isSameBase ) exitProcess(0 ); return 0 ; } nextEntrypoint = (void (*)(void ))((char *)lpAddress + realEntryPointOffset); if ( it ) { newImageBase = (__int16 *)((char *)lpAddress + mp3); relocationImageBaseAddr(newImageBase, (__int64)newImageBase); restoreImportTable(newImageBase, (__int64)funcPtrArrary); if ( ((unsigned int (__fastcall *)(__int16 *, __int64))((char *)lpAddress + mp7))(newImageBase, 1 ) ) nextEntrypoint(); exitProcess(0 ); } else if ( !isSameBase ) { someInnerFunction(); return nextEntrypoint; } return nextEntrypoint; }
这便是 Stage 1 的脱壳过程。总结成文字是,将 entry point 的地址作为基准,读取其附近被精心设计过的字节,将这些字节作为后续各种操作直接或间接的 offset,读取带有 “._” 后缀的同名文件(若不存在则读取同名文件),将其一部分内容用于生成后续各种操作会用到的数组,一部分内容送给反混淆处理或直接复制到自身的内存地址中,然后跳转到数组中 index 为 6 中所储存的 RVA 的地址处,执行 Stage 2。
其实刚开始时我以为这一小段处理完成后就结束了,没想到这只是一个开始……
Stage 2 Stage 2 需要用到 Stage 1 反混淆后的代码,所以我先将 Stage 1 的处理用 Rust 写完,获得了反混淆后的 PE 文件。
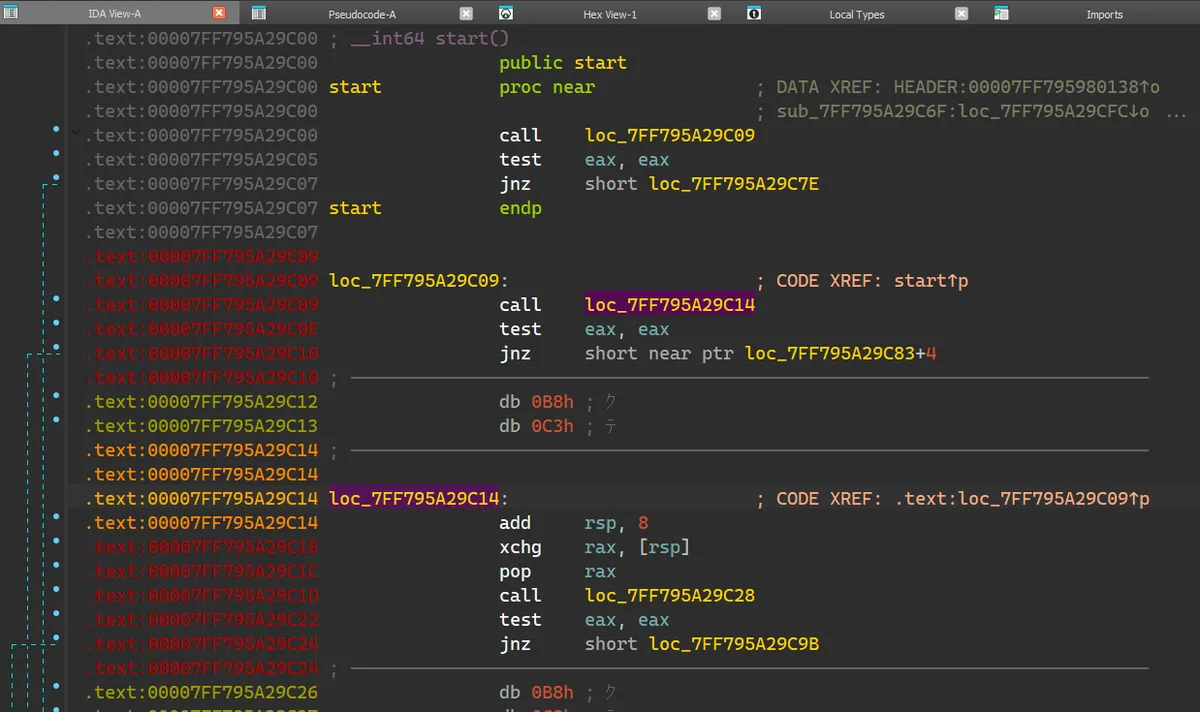
控制流混淆 来到新的 entry point (Stage 1 返回的 RVA),发现大致长这个样子:
入口处直接来了一个 near relative call (call loc_7FF795A29C09),跳转到的地方也是一个 near relative call (call near ptr loc_7FF795A29C12+2),但这次跳转的地址很奇怪,是在一个 move 指令的中间。7FF795A29C14 处定义指令。于是变成:
注意这样子使 7FF795A29C12 和 7FF795A29C13 变成了无意义的两个字节。add rsp, 8) 使其不会返回,时不时地穿插着一些内存读写操作。
到这里就很明显了,Stage 2 采用了字节码级别的控制流混淆,并且在有效指令的周围穿插了无效字节码和误导性指令,使得 IDA 无法将其反编译为 C 伪码,即使是反编译为汇编指令由于误导性指令的存在也不见得一定正确,需要大量的重复手动修正才能获得正确的执行流。
于是我挂载上 IDA 的 debug,尝试执行了几轮后发现确实是这个样子的。
于是我决定终止了继续研究下去。并不是因为无法继续逆向,而是因为不值得。
对于一个程序员来讲,最能让他丧失兴趣的工作不是看上去难得要死的实现,而是枯燥乏味无需思考的重复劳动。
LLM 的尝试 但是,我已经走了这么远,就这样放弃似乎又有些太可惜。于是我想到能否利用 LLM 帮我解析这一片狼藉的字节码级别控制流混淆。ida-pro-mcp ,然后使用 Cline 进行交互。我的 prompt 如下:
1
2
3
4
5
6
7
8
9
10
11
Your task is to analyze a x86_64 PE program currently opened in IDA Pro. You can use the MCP tools to retrieve information. I have done some preliminary research on this program and I will tell you some useful information I got from the investigation: - This program is packed and most part of it are obfuscated, it unobfuscates itself in memory at runtime, most likely by copying some bytes in memory from one address to another. - This program is heavily manipulated on assembly level. Specifically, there are many invalid or unused bytes inserted in the valid bytecode. It jumps over those invalid bytes by using near relative call and manipulates the stack to make the call never returns. So when you do analysis, in most (but not all) cases you can ignore several bytecodes come after call until the next valid bytecodes since they are just some dead code that never get executed. - Do not relay on decompiler due to the above reason, we have to use desassembler or even rely on raw bytes to do analysis. - Start at the entry point and follow the program to see where it goes. It will most likely end up at a weird address that contains invalid code because it unobfuscates itself in memory, but since we are doing static analysis that part of code will not get unobfuscated. When you find you are at such a place, it's time to call it a day. However, remember non-relative call does not mean the final call, you must follow where it goes to see what's inside the target address and decide if it is really a final call. - Focus on memory manipulation operation, our goal is to find how does it unobfuscate itself in memory. That said, we are not interested in the execution flow of the program. - When you find you are at some weird instructions such as `call near ptr loc_7FF795A29C12+2`, but the bytecode at `7FF795A29C14` is a part of instruction `7FF795A29C12 mov eax, 0C48348C3h`, you should prioritize trusting instructions where you come from. That said, you should undefine instructions at `7FF795A29C12`, and re-convert it to instructions at `7FF795A29C14`. The IDA may misidentificate the instructions from bytecode, and those fake instructions are most likely the author of this program's trick to confuse us. - The program contains multiple stages of unobfuscating operations, so do not stop at the first place when you find a suspicious memory manipulation operation. Instead, find all of those. - Do not waste time trying to examine every byte, only focus on the byte needed in the execution flow. - Create or update a report.md with your findings at every stage. Remember to include how does the program unobfuscate itself in memory. For example, it copies X bytes from 0x12345 to 0x54321.
在尝试中,我分别测试了 Gemini 2.5 Pro,Claude Sonnet 4,GPT-4.1。
但没有一个模型能够完整地分析完控制流,全都是早早地得出错误答案或是陷入无限循环。
看来目前 LLM 对于这种复杂且持续时间长的任务还是不太有用啊……
总结 第一次逆向 PE 程序就碰到个这么棘手的玩意儿,真是不幸啊……
个人感想是,CA 对学玛仕 DMM 端 binary 所做的保护相当变态,想要通过正功法脱壳需要付出很大的劳力。并且这种保护似乎不仅是针对学玛仕,包括 PCR 和 马娘在内的 CA 开发的 DMM 端游戏都使用了相同的保护,这一点可以从这些游戏安装后都有一个带 “._” 后缀的文件出现在主程序旁看出来。
但是无论对文件如何加壳,只要能 dump 运行时内存,CA 就永远无法阻止我们获得 plain binary。
References